
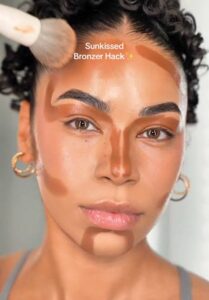
A natural sun-kissed look comes from placing bronzer where the sun would naturally warm your face, rather than covering the entire complexion. Use a small amount of bronzer on the forehead, cheekbones, bridge of the nose, and lightly along the jawline. Blend the edges well and build the color gradually for a soft, believable finish.
What Is Bronzer?
Bronzer is a makeup product used to add warmth and a healthy-looking glow to the complexion. Unlike contour, which is generally used to create the appearance of shadows and definition, bronzer is designed to make the skin look warmer and more radiant.
Bronzer can be found in several formulas, including:
- Powder bronzer
- Cream bronzer
- Liquid bronzer
- Stick bronzer
The right formula depends on your skin type, makeup style, and the finish you prefer.
For a natural sun-kissed makeup look, the goal isn’t to make your face dramatically darker. It’s to add subtle warmth in areas that naturally catch sunlight.
Bronzer vs. Contour: What’s the Difference?
Bronzer and contour are often used together, but they serve different purposes.
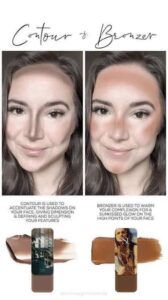
Bronzer adds warmth, while contour creates the appearance of shadows and definition.
| Bronzer | Contour |
|---|---|
| Adds warmth | Adds definition |
| Usually warmer in tone | Usually more neutral or cool |
| Mimics a sun-kissed effect | Mimics natural shadows |
| Applied where sunlight hits | Applied beneath cheekbones, jawline, and other areas |
| Creates a healthy glow | Creates a sculpted appearance |
You don’t need contour to create a beautiful everyday makeup look. A well-blended bronzer can add enough dimension for a soft, natural finish.
How to Choose the Right Bronzer
Choosing the right shade is one of the most important parts of applying bronzer naturally.
A bronzer that’s too dark can look muddy or obvious, while one that’s too orange may make the complexion look unnatural.
Choose a Shade Slightly Deeper Than Your Skin
For an everyday sun-kissed effect, look for a shade that is slightly deeper and warmer than your natural complexion.
You don’t need a dramatic color difference.
The ideal shade should blend into your skin rather than sitting visibly on top of it.
Consider Your Undertone
Your skin’s undertone can help guide your bronzer choice.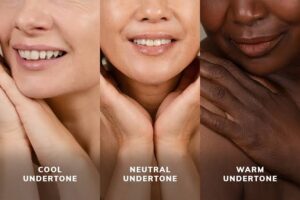
Warm undertones:
Golden, caramel, honey, or warm brown bronzers can work well.
Neutral undertones:
Balanced golden-brown or neutral bronzers are usually versatile.
Cool undertones:
Avoid extremely orange shades. Softer neutral or slightly warm browns may look more natural.
Remember that undertone isn’t the same as skin depth. Someone with deep skin can have a cool undertone, while someone with fair skin can have a warm undertone.
Powder vs. Cream Bronzer
Both powder and cream formulas can create a natural finish, but they behave differently.
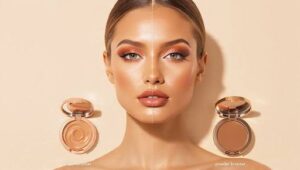
Powder Bronzer
Powder bronzer is easy to control and particularly useful if you prefer a traditional makeup routine.
It’s a good option for:
- Beginners
- Oily or combination skin
- Quick everyday makeup
- Layering over powder products
Use a fluffy brush and apply a small amount at a time.
Cream Bronzer
Cream bronzer tends to create a softer, more skin-like finish.
It can be useful for:
- Dry or normal skin
- Dewy makeup looks
- Minimal makeup routines
- Natural-looking base makeup
Apply it with a makeup sponge, dense brush, or your fingers depending on the product.
Which Is Better for Beginners?
If you’re new to bronzer, powder is often easier to control, especially when you’re learning how much product to use.
That said, a sheer cream formula can also be beginner-friendly when applied gradually.
How to Apply Bronzer for a Natural Sun-Kissed Look
The best way to apply bronzer is to start with a small amount and place it strategically rather than spreading it across your entire face.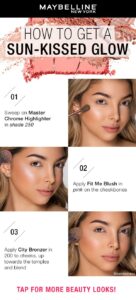
Step 1: Prep Your Skin
Start with your usual skincare routine and allow your skincare products to settle before applying makeup.
If you’re wearing foundation, apply your foundation and concealer first.
Your base should look even but not overly thick. Heavy layers underneath can make bronzer more difficult to blend.
Step 2: Choose the Right Brush
For powder bronzer, use a soft, fluffy brush.
A brush that’s too dense can deposit too much pigment in one area.
Look for a brush that allows you to diffuse the product easily.
For cream bronzer, you can use:
- A dense angled brush
- A rounded complexion brush
- A damp makeup sponge
- Your fingertips, depending on the formula
The tool matters less than your technique. The key is to blend rather than leave obvious edges.
Step 3: Start at the Forehead
Pick up a small amount of bronzer and lightly sweep it around the outer areas of your forehead.
Focus near the hairline rather than placing a heavy layer in the center of the forehead.
Use light, sweeping motions.
If you’re using a powder, tap off excess product before touching your face.
Step 4: Warm Up the Cheekbones
Your cheek area is one of the most important places for bronzer.
Lightly apply bronzer around the upper part of the cheek area, starting near the ear and moving toward the center of the face.
Don’t take the product too close to your nose.
The goal is to create warmth rather than a sharp stripe.
A useful trick
Smile naturally or look straight ahead while applying. This makes it easier to see where your cheeks naturally sit.
Keep the color soft and diffused.
Step 5: Add a Little Bronzer to the Nose
For a naturally sun-kissed effect, you can lightly dust a small amount across the bridge and tip of your nose.
Use very little product here.
The nose is small compared with the rest of the face, so too much bronzer can quickly look heavy.
A subtle touch can make the overall makeup look more cohesive.
Step 6: Warm the Jawline
Lightly blend bronzer along the jawline to connect the warmth on your face with your neck.
This step is particularly useful when your foundation creates a noticeable difference between your face and neck.
Don’t create a dark line underneath the jaw.
Instead, blend the product softly around the edges.
Step 7: Blend Everything Together
This is where the makeup starts to look natural.
Take a clean fluffy brush or your original brush with very little remaining product and soften the edges.
Look at your face in natural light if possible.
You shouldn’t be able to easily identify where the bronzer begins and ends.
If you can see a clear bronzer stripe, keep blending.
Step 8: Build the Color Slowly
If the first layer isn’t warm enough, add another light layer.
It’s much easier to build bronzer than to fix too much product.
Use the simple rule:
Apply a little → blend → check → build if needed.
This technique is especially helpful for beginners.
Where Should You Apply Bronzer on Your Face?
For a natural effect, concentrate bronzer around areas that would naturally receive sunlight.
These commonly include: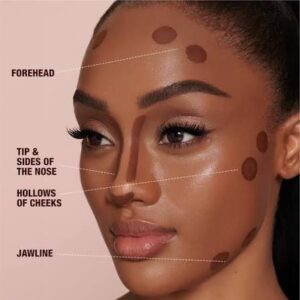
- Upper forehead near the hairline
- Upper cheek area
- Bridge and tip of the nose
- Outer jawline
- Lightly around the temples
You don’t have to use all of these areas.
If you want an especially subtle look, focus mainly on the forehead and cheeks.
How to Apply Bronzer Naturally for Different Face Shapes
Bronzer doesn’t have to be applied exactly the same way on every face.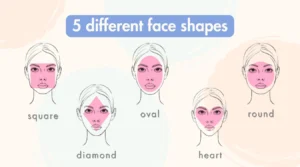
Your face shape can influence where you place warmth.
Round Face
Focus bronzer slightly higher on the outer cheeks and temples.
Keep the application soft rather than creating a strong horizontal line.
Oval Face
An oval face usually works well with traditional sun-kissed placement around the forehead, cheeks, nose, and jawline.
Keep everything balanced.
Square Face
Add warmth around the temples and outer forehead.
You can also lightly warm the jawline for a softer overall appearance.
Heart-Shaped Face
Concentrate warmth around the upper forehead and outer cheek area.
Blend carefully around the temples.
Long Face
Avoid placing too much bronzer vertically along the sides of the face.
Instead, concentrate warmth across the forehead, cheeks, and a small amount around the chin to create a balanced appearance.
These aren’t strict rules. Makeup is adjustable, so use the placement that looks most natural to you.
How to Apply Bronzer for Different Skin Types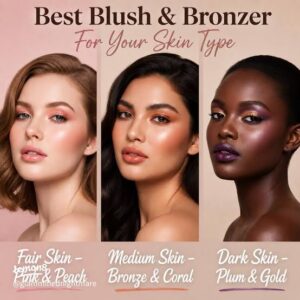
Oily Skin
Powder bronzer may be easier to manage if your skin becomes shiny throughout the day.
Apply it over a properly set base and avoid layering too much powder.
Dry Skin
Cream or liquid bronzer can give a more skin-like appearance.
Make sure your skin is properly moisturized before makeup.
Avoid applying excessive powder over dry areas.
Combination Skin
You can combine formulas strategically.
For example, cream bronzer can be used as the main warmth layer, followed by a small amount of powder bronzer in areas where you want additional longevity.
Sensitive Skin
Keep your routine simple and introduce new makeup products gradually.
If a product causes persistent irritation, discontinue it.
Bronzer Placement for Different Makeup Looks
The amount and placement of bronzer should match the overall style of your makeup.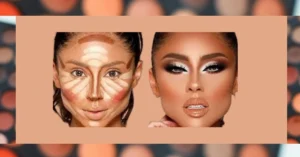
Natural Everyday Makeup
Use a small amount on the forehead and cheeks with a light touch on the nose.
Soft Glam Makeup
Build slightly more warmth and combine bronzer with blush and highlighter.
No-Makeup Makeup
Use a sheer formula and blend thoroughly.
The goal should be warmth that looks almost invisible.
Full Glam Makeup
You can use bronzer alongside contour, blush, and highlighter.
Just make sure each product has a clear purpose so the complexion doesn’t become overly heavy.
How to Use Bronzer With Blush and Highlighter
Bronzer, blush, and highlighter work together to create dimension.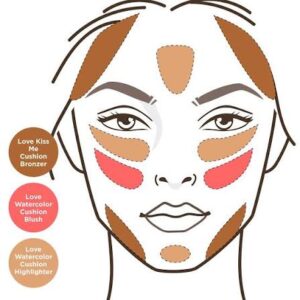
A simple order is:
- Bronzer — adds warmth
- Blush — adds color
- Highlighter — adds light and glow
The products can overlap slightly, but their edges should remain soft.
For a natural finish, try placing blush between your bronzer and the center of your face.
Then add a small amount of highlighter to areas such as the tops of the cheekbones if desired.
Should Bronzer Go Before or After Blush?
It depends on the formula and your preferred technique.
With a traditional powder routine, bronzer is commonly applied before powder blush.
With cream products, you generally want to work from lighter, cream-based layers toward powder products.
A simple cream routine might look like:
Cream bronzer → cream blush → setting powder → optional powder products
Always follow the texture of the products you’re using. Applying a dry powder directly over a wet, unset base can sometimes make blending difficult.
Common Bronzer Mistakes to Avoid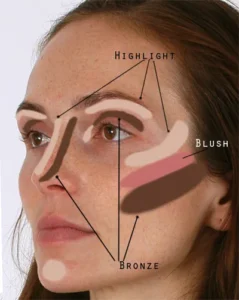
1. Using Too Much Product
This is probably the easiest mistake to make.
A large amount of bronzer can make the face look muddy instead of naturally warm.
Fix: Start with less than you think you need.
2. Choosing an Extremely Orange Shade
A warm bronzer doesn’t have to be orange.
If the shade clashes with your complexion, the result can look artificial.
Fix: Test shades in good lighting and consider your undertone.
3. Applying Bronzer Everywhere
Bronzer isn’t meant to replace foundation.
Covering the entire face with a dark layer can remove the natural dimension you’re trying to create.
Fix: Focus on strategic areas.
4. Creating Harsh Lines
Visible stripes along the cheeks or jawline are a common sign that the product hasn’t been blended enough.
Fix: Use a clean brush to soften the edges.
5. Forgetting the Neck
If your face is noticeably warmer than your neck, the makeup can look disconnected.
Fix: Blend any remaining product lightly along the jaw and upper neck when appropriate.
6. Using a Very Dense Brush
A dense brush can deposit a lot of pigment quickly.
This isn’t necessarily wrong, but it requires more control.
Fix: Beginners may find a softer, fluffier brush easier to work with.
7. Applying Bronzer Before Your Base Is Ready
Cream products applied over an unset foundation can move the base underneath.
Fix: Give your base enough time to settle and use compatible formulas.
8. Ignoring Natural Lighting
Makeup can look very different under indoor lighting compared with daylight.
Fix: Check your makeup near a window or in natural light when possible.
Bronzer Makeup Tips for Beginners
If you’re learning how to use bronzer on your face, keep the process simple.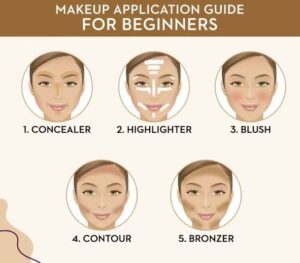
Start With One Product
You don’t need multiple bronzers to create warmth.
Learn how one formula behaves first.
Use a Small Amount
Tap or shake off excess powder before applying.
For cream formulas, begin with a tiny amount.
Work in Layers
A light first layer gives you more control.
Keep Your Hand Light
Heavy pressure can create concentrated patches.
Hold the brush farther from the bristles for a softer application.
Step Back and Look at the Whole Face
Don’t judge one cheek in isolation.
Check how the bronzer works with your foundation, blush, and overall complexion.
Blend Toward the Hairline
This helps prevent visible edges around the forehead.
Don’t Chase Perfection
Natural makeup isn’t perfectly symmetrical.
The goal is a balanced, believable appearance—not identical brush strokes on both sides.
How to Make Bronzer Look More Natural
If your bronzer looks obvious, several small changes can help.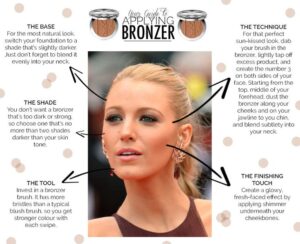
Use less product.
The simplest solution is often the most effective.
Choose a more suitable shade.
A slightly warmer or more neutral tone may blend better with your complexion.
Use a softer brush.
A fluffy brush can diffuse powder more effectively.
Blend beyond the initial application area.
Softening the edges helps the color melt into the base.
Add a touch of blush.
Bronzer alone can sometimes look flat. A natural blush can make the warmth look more believable.
Can You Use Bronzer Without Foundation?
Yes. Bronzer can be worn without foundation.
For a simple everyday look, you can apply moisturizer or sunscreen, allow it to settle, and then use a small amount of bronzer on selected areas.
This works particularly well when you don’t want full coverage.
However, powder bronzer may look patchy if applied directly over a very wet skincare product. Allow your skincare to absorb before applying makeup.
Can You Use Bronzer on Bare Skin?
Yes, but the result depends on the formula and what’s underneath it.
Cream and liquid bronzers can sometimes blend well over moisturized bare skin.
Powder bronzer generally works best over a suitable base or a properly set surface.
If you apply powder directly over oily or wet skincare, it may cling unevenly.
How Much Bronzer Should You Use?
There’s no universal amount because pigmentation varies between products and skin tones.
For beginners, a useful approach is:
Start with one light layer.
Check the result.
Then add another small amount if you want more warmth.
Your bronzer should be noticeable enough to add dimension but subtle enough that it doesn’t look like a separate layer of color.
Natural Sun-Kissed Makeup: A Simple Routine
If you want a quick routine, try this: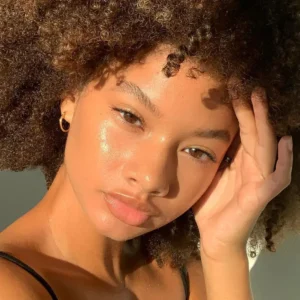
- Cleanse and moisturize your skin.
- Apply sunscreen during the daytime.
- Apply foundation or a lightweight base if desired.
- Add concealer where needed.
- Apply a small amount of bronzer around the forehead and cheek area.
- Lightly warm the nose and jawline.
- Blend everything carefully.
- Add blush.
- Apply a small amount of highlighter if desired.
- Check the finished look in natural light.
The key is restraint. A sun-kissed look should appear like warmth coming from the skin, not like a heavy layer of makeup.
Frequently Asked Questions
1. How do you apply bronzer correctly?
Apply a small amount of bronzer to areas that naturally catch sunlight, such as the forehead, upper cheeks, nose, and jawline. Use a fluffy brush for powder or a suitable brush or sponge for cream formulas. Blend thoroughly and build the color gradually.
2. Where should bronzer be applied on the face?
Bronzer is typically applied around the outer forehead, temples, upper cheek area, bridge of the nose, and jawline. You don’t need to apply it to every area. Focus on locations where natural sunlight would create warmth.
3. Should bronzer be lighter or darker than your foundation?
Bronzer is generally deeper and warmer than your foundation, but it shouldn’t be dramatically darker. For a natural finish, choose a shade that gives your complexion subtle warmth without creating an obvious contrast.
4. Do you put bronzer on before or after foundation?
Bronzer is generally applied after foundation when you’re using a traditional powder makeup routine. Cream bronzer is usually applied over your base before setting with powder, depending on the products you’re using.
5. Can beginners use bronzer?
Yes. Bronzer is relatively easy to learn when you start with a small amount and blend gradually. Powder bronzer can be particularly straightforward for beginners because you can build the intensity slowly.
6. Should bronzer go above or below the cheekbones?
For a sun-kissed look, bronzer is usually placed around the upper cheek area rather than directly underneath the cheekbone. Applying it too low can make the face look more sculpted than sun-kissed.
7. Can I use bronzer without contour?
Absolutely. Bronzer and contour have different purposes. Bronzer adds warmth, so you can create a natural, dimensional makeup look without using contour.
8. Why does my bronzer look orange?
Your bronzer may be too warm for your undertone, too dark, or simply too pigmented for the amount you’re applying. Try a more neutral shade and use less product.
9. How can I stop bronzer from looking patchy?
Start with a smooth base, use a suitable brush, apply a small amount, and blend in light motions. If you’re using cream bronzer, avoid applying it over an excessively wet or uneven base.
10. Can bronzer be used as contour?
It can add some definition, but bronzer isn’t the same as contour. Because bronzer is usually warmer, it creates warmth rather than the neutral shadow effect typically associated with contouring.
Key Takeaways
- Bronzer adds warmth; contour adds shadow and definition.
- Apply bronzer where the sun would naturally warm your face.
- Start with a small amount and build gradually.
- Choose a shade that complements your skin depth and undertone.
- Use a fluffy brush for controlled powder application.
- Cream bronzer can create a softer, skin-like finish.
- Blend around the forehead, cheeks, nose, and jawline rather than covering the entire face.
- Avoid shades that look excessively orange or muddy.
- Don’t forget to check your makeup in natural light.
- A natural sun-kissed look depends more on placement and blending than on using a lot of product.
Final Thoughts
Learning how to apply bronzer for a natural sun-kissed look is mostly about understanding placement, choosing a flattering shade, and using a light hand. You don’t need complicated techniques or a large amount of product. Start with a small amount, place it where natural warmth would appear, and blend until there are no obvious edges.
Once you’ve mastered that basic technique, you can adjust the placement and intensity to suit your face shape, skin type, and preferred makeup style. The best bronzer application is the one that looks like a natural part of your complexion rather than a separate layer sitting on top of it.